Monday, May 30, 2011

Stick pins


My stick pin box. The box was already done just added a piece of material and fiber fill.


Made these butterfly pins from some old beads my kids had. They kinda look like the Webster's butterfly pins.


I saw some of the Webster's flower pins at a lss. And I remembered I had some flower beads. Mine came with small leaves in the bag.


I used some glass heart beads to make these ones.


With these ones I just used different kind of beads. I tried to make a few for different kinds of Holidays. I really like the way the Halloween skull one came out. I lived in Japan for three years and thought I would make a few pins to go with the pictures we have of there.


And the last ones are from left over beads that I used to make wind chimes from. I still have a lot of beads left over and some of the jewelery pieces and can't wait to make more. Thanks for stopping by and having a look.
Hugs Virginia

Thursday, May 19, 2011

Spin wheel flower


Supplies
Marvy Uchida spin wheel punch
Card stock any color and then green for the stems and leaves
Black pen for lines in flower
Ink pad or chalk
Flower center of choice.


You will need to punch out three or four depending on the amount of flowers you want. I made three. You will need two different colors of card stock and punch out three flowers of each color.


I just by hand drew three stems at an angle and different sizes and cut them out as well as a few leaves.


In the above photo I am just showing different colors you can use and the shape of the punched flower.


In this photo you can notice that by flipping which card stock you choose to use on top changes the color of the flower.


Once you have chosen which color you want to show off the most. You will layer them and glue them on top of each other. You will need to make sure that before you glue them down that the bottom point of the flower is pointed to the opposite facing point and them glue. I did white and red and just kept them both with the facing points in the same direction and it came out looking like a Christmas mint candy. And again here is the finished product. Thank you for looking and have a great day.

velvet flower


Not sure what everyone is calling these flower. Guess I should have looked it up. Oh well.


Here are the supplies.
Material- any kind will work I like pliable material much easier to work with.
A ruler
Leaves
Flower stamens
Needle and thread
Glue gun


I measured 18 inches in length by 2 inches in width. Folded it in half.  Thread and gather the bottom of the open side and sew thru to the end and gather tightly. Tie it off so it won't come undone.


After you have done that just start rolling it in a circle gluing it in spots to keep it together. Adjust it to your liking and I added leaves and flower stamens to the center. Again here is the finished product.


scrapbook room redo over.


These are pictures of my scrap room. My neighbor redid his kitchen and gave me a few of his kitchen cabinets.
In these photos it is total chaos. I am slowing going thru things I no longer use or don't want and getting rid of them.


 This is the other side of the room. I had to pile everything there just to get the cabinets in and where I wanted them.


 Here is where they are going to go hopefully permanently.


 Just a little organization going on here in this corner. I have put all of my stamps in these draws and in this corner.


 The bottom cabinets did not come with the counter top so hubby had to cut a piece of wood. He then stained it and mounted it to the top. He stained it the color of my desk and the frame to the doors.It came out really nice.


Here is where the top cabinets sitting on the counter will go.


And finally the top cabinets are up. I will be posting several pictures over time of a few things I have picked up to store some of my supplies. Thanks for stopping by.

Inside corner punch

I was playing around with my corner punches and came up with this. I know a lot of ladies have been showing how to do outer circles using corner punches. Well I used the photo mound corner punches. You do have to use these photo ones so that way you will have a way to layer and have something to hold it with.
Here are the supplies you will need.
Anything that will let you cut out a circle. Template, a plate, or a cutter.
Scissors or cutting blade
Pencil
Punches. I used two of my EK Succes.

I have several different photo corner punches. These are punches that when you punch into the paper . It allows you to slip the corners of the photo into and will hold it there. But the punch will need to let you have access to remove or already give you the ability to slid it all the way back. I have some that won't allow this they will only punch the very corner of your paper. You will just have to play around with your punches and find out.

I used the # 5 circle from my Fiskars circle template and traced out the circle and used my scissors to cut the circle. I do have the circle blade cutter from Fiskars but I don't like it. After you cut out the circle you will use your punch to punch all the way around the circle like the above photo.

Now you don't have to add a smaller circle in the middle. But I did. I use the # 3 and # 4 templates to make smaller circles to slip into the slits of the punch. You will have to play with this depending on the punch you use. For instance I used the # 4 circle template but still had to trim off about a 1/2 a centimeter from the outer edge when I used the heart punch. But when I used the bubble punch the # 3 fit just fine. Again you just need to play around and find out what work for you. Here are a few more examples.
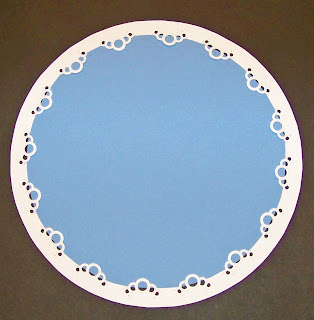
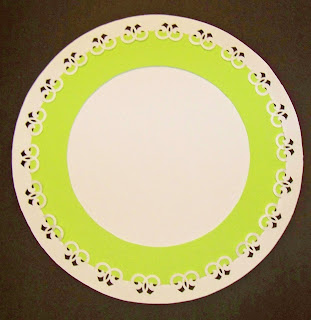
Now what I did was turn the punch over so that way I would have a guide to punch the shape. I am showing you using the bubble punch. I just lined the edge of the punch with the edge of the last punched bubble. Just look at the photo below for example. Also with these two punches when you remove the bottom plastic thing it allows you to push the paper back further. And you will need to use card stock that will work well when punching. Some card stock is too thick. And I really like these two punches , while they are the only two I have that will work well for this technique. But they have a edge inside that stops the paper and gives it the right amount of edge to the circle.


In the top photo I traced the inside of the circle template and cut it out so that the outer white circle would show thru. You will also notice you will need the inner circle to be able to fit to the edge of the punched shape so that it won't slip out. Again just play around with it.

After finding the right circle shapes to fit the inside. I then used some decorative scissors to very carefully cut around the outer side of the circle. You won't have much of a lip there so do be careful. I then pulled out the inner circle and inked the edges of the punched shape and outer side and slipped the inside circle back in  place. Here again is the finished piece. Hope you enjoy playing with your punches and have a great day.
Hugs Virginia

Thursday, April 21, 2011

Quick detail about the scalloped flower

So sorry I left out an important detail. When gathering the tulle you will not gather it as tight as you did the material cause it will gather tighter. Just a little looser then the flower or what ends up happening is the tulle will disappear in the center of the flower. Hope that makes sense. Leave me a message if not clear. Sorry I figured out how to change my post and added this info into the tutorial. Can't figure out how to remove this post..

Scalloped flower


For these flower all I did was add different size and color of tulle. On the bottom flower I add a retro flower that I had punched out of a brown paper sack lunch bag and then embossed it with several layers of clear embossing powder. It gives it a translucent appearance.
Supplies. Any thing that will give you a scalloped border. I used the border that I got from a local dollar store. If you ever got to help the teacher decorate the classroom bulletin boards you know what one of these is. I got the beach one turned it over  and measured from the top towards the scalloped edge inward by an inch. Just didn't want the flower to be so wide when I was done. So your strip of material will measure 1 in wide by 18 inches long. This is really important. You have to use material that will not fray. I used some velvet brown that I got at Wal-Mart. You will trace the scalloped edge and don't worry so much about the line showing just trace it on the underside. When you are all done with cutting and sewing it it won't even be visible.
You will gather the straight edge with matching thread and don't worry if you don't have any white will do and after you gather it it is not really visible. I used white to show what I was doing in this tutorial.

After I gathered it and pulled it tight the flower pretty much comes together. The scalloped edge is what I think makes it resemble a flower more.

You will then sew the two edges together and then sew the sides together and again will not show when you flip the flower over.

You will then do the same steps with the tulle. The only thing with gathering the tulle is you will not gather it as tightly as you did the material. The tulle will get lost in the center of the flower. So just gather is very loosely and refer to the photo for a reference.


You can but don't have to. Punch or cut a 1 1/2 inch circle from card stock to help glue and hold down the flower to your project.

You will then layer your tulle on top of the material flower and you can embellish it with anything you like in the center. I used a vintage ear ring I got at a local thrift store and just removed the backing. and used my hot glue gun and glue it all together. Here again is the finished flower.