I was playing around with my corner punches and came up with this. I know a lot of ladies have been showing how to do outer circles using corner punches. Well I used the photo mound corner punches. You do have to use these photo ones so that way you will have a way to layer and have something to hold it with.
Here are the supplies you will need.
Anything that will let you cut out a circle. Template, a plate, or a cutter.
Scissors or cutting blade
Pencil
Punches. I used two of my EK Succes.
I have several different photo corner punches. These are punches that when you punch into the paper . It allows you to slip the corners of the photo into and will hold it there. But the punch will need to let you have access to remove or already give you the ability to slid it all the way back. I have some that won't allow this they will only punch the very corner of your paper. You will just have to play around with your punches and find out.
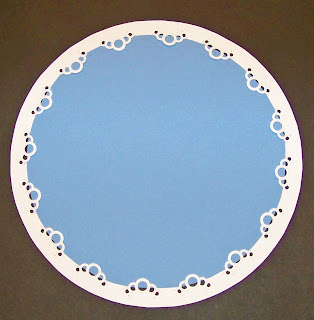
I used the # 5 circle from my Fiskars circle template and traced out the circle and used my scissors to cut the circle. I do have the circle blade cutter from Fiskars but I don't like it. After you cut out the circle you will use your punch to punch all the way around the circle like the above photo.
Now you don't have to add a smaller circle in the middle. But I did. I use the # 3 and # 4 templates to make smaller circles to slip into the slits of the punch. You will have to play with this depending on the punch you use. For instance I used the # 4 circle template but still had to trim off about a 1/2 a centimeter from the outer edge when I used the heart punch. But when I used the bubble punch the # 3 fit just fine. Again you just need to play around and find out what work for you. Here are a few more examples.

Now what I did was turn the punch over so that way I would have a guide to punch the shape. I am showing you using the bubble punch. I just lined the edge of the punch with the edge of the last punched bubble. Just look at the photo below for example. Also with these two punches when you remove the bottom plastic thing it allows you to push the paper back further. And you will need to use card stock that will work well when punching. Some card stock is too thick. And I really like these two punches , while they are the only two I have that will work well for this technique. But they have a edge inside that stops the paper and gives it the right amount of edge to the circle.
In the top photo I traced the inside of the circle template and cut it out so that the outer white circle would show thru. You will also notice you will need the inner circle to be able to fit to the edge of the punched shape so that it won't slip out. Again just play around with it.
After finding the right circle shapes to fit the inside. I then used some decorative scissors to very carefully cut around the outer side of the circle. You won't have much of a lip there so do be careful. I then pulled out the inner circle and inked the edges of the punched shape and outer side and slipped the inside circle back in place. Here again is the finished piece. Hope you enjoy playing with your punches and have a great day.
Hugs Virginia


